
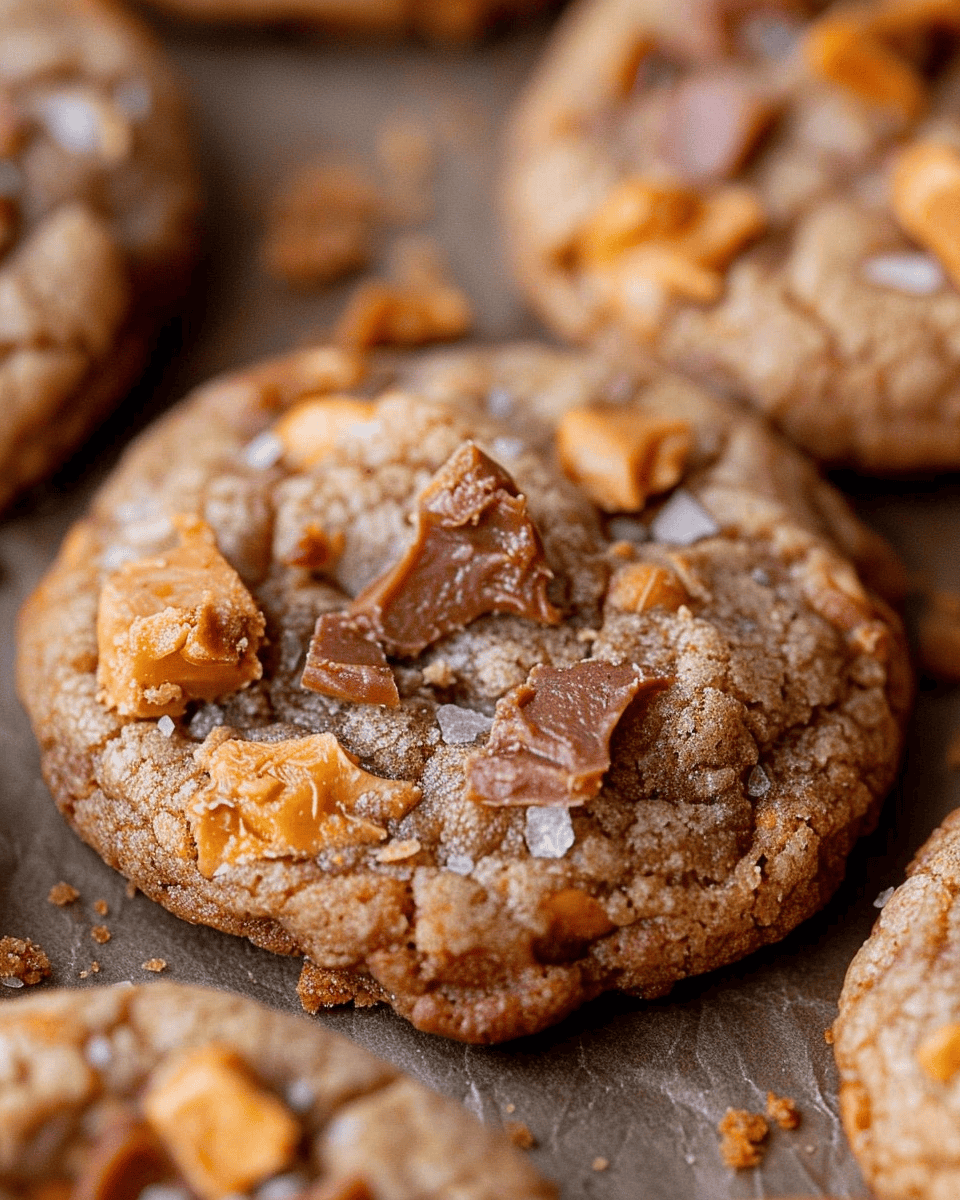
Peanut Butter Butterfinger Cookies: A Perfectly Sweet and Crunchy Treat
If you’re a fan of the classic combination of peanut butter and chocolate, these Peanut Butter Butterfinger Cookies are going to become your new favorite treat. Packed with creamy peanut butter and crunchy Butterfinger pieces, these cookies are a delightful mix of textures and flavors that will have you reaching for more. They’re easy to make and perfect for sharing with friends and family—or keeping all to yourself!
Ingredients
- 3/4 cup butter, softened (1 and 1/2 sticks)
- 1/2 cup granulated sugar
- 1/2 cup packed brown sugar
- 1 cup peanut butter (do not use natural peanut butter)
- 1 large egg
- 1 1/2 teaspoons vanilla extract
- 1 1/2 cups all-purpose flour
- 1/2 teaspoon baking soda
- 1/2 teaspoon baking powder
- 1/4 teaspoon kosher salt
- 16 ounces Butterfinger, chopped
Instructions
1. Cream the Butter and Sugars
In a large bowl or stand mixer, beat 3/4 cup softened butter until smooth and creamy, scraping the sides as needed. Add 1/2 cup granulated sugar and 1/2 cup packed brown sugar, and beat for about 2 minutes until the mixture is fluffy and well combined. Make sure there are no chunks of butter, as this will ensure a smooth texture in your cookies.
2. Add Peanut Butter and Wet Ingredients
Mix in 1 cup peanut butter until smooth. Then add 1 large egg and 1 1/2 teaspoons vanilla extract, beating until everything is fully incorporated. Scrape down the sides of the bowl as needed to ensure all the ingredients are well mixed.
3. Combine the Dry Ingredients
Add 1 1/2 cups all-purpose flour, 1/2 teaspoon baking soda, 1/2 teaspoon baking powder, and 1/4 teaspoon kosher salt to the bowl, but don’t mix yet. Stir the dry ingredients together lightly with a spoon or teaspoon to break up any clumps before turning on the mixer. Then, mix until just combined. Be careful not to overmix, as overmixing can lead to tough cookies.
4. Add the Butterfingers
Gently fold in 16 ounces of chopped Butterfingers until just incorporated. You can use pre-packaged Butterfinger Bits or chop full-size Butterfinger bars if needed. The Butterfinger pieces add a delightful crunch and a burst of flavor in every bite.
5. Chill the Dough
Cover the dough and chill for 15 minutes to an hour (or up to 24 hours) to firm up the dough and enhance the flavor. Chilling the dough helps the cookies hold their shape and prevents them from spreading too much while baking. Plus, it gives the flavors a chance to meld together.
6. Preheat the Oven
Preheat your oven to 350°F (175°C). Line two baking sheets with parchment paper or silicone baking mats to prevent the cookies from sticking and to make cleanup easier.
7. Shape the Cookies
Shape the chilled dough into 2-inch balls using a cookie scoop. Place them on the prepared baking sheets about 1-2 inches apart. This spacing allows the cookies to spread slightly as they bake.
8. Bake the Cookies
Bake the cookies for about 10 minutes, until the edges are set and the tops are no longer shiny. The cookies will be puffy, but should spread slightly. If they haven’t spread enough, gently press the tops with a spatula to flatten them slightly. If you have extra Butterfinger crumbles, sprinkle them on top of the warm cookies for an extra touch of crunch and flavor.
9. Cool the Cookies
Let the cookies set on the baking sheet for at least 5 minutes before transferring them to a wire rack to cool completely. Although tempting, these cookies are best enjoyed when they have cooled to room temperature, allowing the Butterfinger pieces to regain their crunchy texture.
Serving Information
- Prep Time: 15 minutes
- Chill Time: 15 minutes – 1 hour
- Baking Time: 10 minutes
- Servings: Approximately 25 cookies
Tips for Perfect Peanut Butter Butterfinger Cookies
- Use Room Temperature Ingredients: Ensure the butter and egg are at room temperature for easier mixing and better consistency in the dough.
- Don’t Overbake: The cookies may appear slightly underdone when you remove them from the oven, but they will continue to set as they cool. This ensures they stay soft and chewy.
- Store Properly: Store the cookies in an airtight container at room temperature for up to a week. For longer storage, freeze the cookies in a sealed bag or container for up to three months.
Conclusion
These Peanut Butter Butterfinger Cookies are a deliciously indulgent treat that combines the rich, creamy flavor of peanut butter with the irresistible crunch of Butterfinger candy. They’re perfect for any occasion, whether you’re baking for a party, a family gathering, or just a sweet treat at home. Easy to make and even easier to enjoy, these cookies are sure to become a favorite in your household.
Print
Peanut Butter Butterfinger Cookies
- Total Time: 1 hour 40 min
- Yield: 25 1x
Description
Peanut Butter Butterfinger Cookies are the ultimate treat for peanut butter and chocolate lovers. These cookies are rich, chewy, and packed with the crunch of chopped Butterfinger candies. The dough combines creamy peanut butter with both granulated and brown sugars for a perfectly balanced sweetness. The Butterfinger pieces melt slightly during baking, adding a delightful texture contrast to each bite. Whether enjoyed fresh or after cooling, these cookies are a satisfying indulgence that’s hard to resist.
Ingredients
3/4 cup butter, softened (1 and 1/2 sticks)
1/2 cup granulated sugar
1/2 cup packed brown sugar
1 cup peanut butter (do not use natural peanut butter)
1 large egg
1 1/2 teaspoons vanilla extract
1 1/2 cups all-purpose flour
1/2 teaspoon baking soda
1/2 teaspoon baking powder
1/4 teaspoon kosher salt
16 ounces Butterfinger, chopped
Instructions
Cream Butter and Sugars: In a large bowl or stand mixer, beat 3/4 cup softened butter until smooth and creamy, scraping the sides as needed. Add 1/2 cup granulated sugar and 1/2 cup packed brown sugar, and beat for about 2 minutes until the mixture is fluffy and well combined. Make sure there are no chunks of butter.
Add Peanut Butter and Wet Ingredients: Mix in 1 cup peanut butter until smooth. Then add 1 large egg and 1 1/2 teaspoons vanilla extract, beating until everything is fully incorporated. Scrape down the sides of the bowl as needed.
Combine Dry Ingredients: Add 1 1/2 cups all-purpose flour, 1/2 teaspoon baking soda, 1/2 teaspoon baking powder, and 1/4 teaspoon kosher salt to the bowl, but don’t mix yet. Stir the dry ingredients together lightly with a spoon or teaspoon to break up any clumps before turning on the mixer. Then, mix until just combined, being careful not to overmix.
Add Butterfingers: Gently fold in 16 ounces of chopped Butterfingers until just incorporated. You can use pre-packaged Butterfinger Bits or chop full-size Butterfinger bars if needed.
Chill the Dough: Cover the dough and chill for 15 minutes to an hour (or up to 24 hours) to firm up the dough and enhance the flavor. Try not to eat too much of the dough—it’s tempting!
Preheat Oven: Preheat the oven to 350°F (175°C). Line two baking sheets with parchment paper or silicone baking mats.
Shape Cookies: Shape the chilled dough into 2-inch balls using a cookie scoop. Place them on the prepared baking sheets about 1-2 inches apart.
Bake: Bake the cookies for about 10 minutes, until the edges are set and the tops are no longer shiny. The cookies will be puffy, but should spread slightly. If they haven’t spread enough, gently press the tops with a spatula to flatten them slightly. If you have extra Butterfinger crumbles, sprinkle them on top of the warm cookies.
Cool: Let the cookies set on the baking sheet for at least 5 minutes before transferring them to a wire rack to cool completely. Although tempting, these cookies are best enjoyed when they have cooled to room temperature, allowing the Butterfinger pieces to regain their crunchy texture.
- Prep Time: 15 minutes
- Cook Time: 10 minutes